
Monday, April 25, 2011
Sunday, April 24, 2011
The iPad as a navigation tool..........
I love my iPad. I love it so much that I don't want it to have an untimely death. As a planning and research tool it is outstanding. Within cell phone range you can get weather forecasts, book flight tickets and get e-mail for a reasonable fee, which you can cancel and leave dormant at any time (I HATE monthly fees). Must have apps include;
Navionics HD
and
Charts & Tides WITH Active Captain.
If you haven't seen Active Captain you need to. The Charts and Tides app, while not perfect, allows you to download AC onto your iPad for offline use. The content is excellent and getting better all the time. I wonder how long it will be before they (or whoever purchases it) starts charging.
BUT!!!!!!!!!!!!!!!!!!!!!!!!!!!!
At 3am, when the seas get up and you get hit by a squall your iPad (and laptop) should be safely tucked up asleep in its bunk. In the cockpit should be your trusty Garmin (or whatever) plotter which is bolted on and is somewhat weather proof. You can go to all the effort of encasing the iPad in a plexiglass covered case but that defeats the touch screen benefit of the unit. My iPad will be secured at the chart station and only venture up on fine days or at anchor.
Just my 2 cents worth.
Lovely delivery trip and lessons learned....

Just back from a great trip helping a lovely family move their Whitby 42 from the Bahamas to Charleston. I take every opportunity to sail on Whitby's as each time I learn something new. The trip was a combination of a few overnight sails / motor and a trip inside the ICW when conditions outside did not look inviting. Lessons learned included;
1. Firming up my views on the use of Ipod's/laptop's versus dedicated GPS plotters in the cockpit.
2. The need to redesign the saloon table for offshore work.
I plan to rejoin the vessel for the offshore leg from Norfolk to NY.
Tuesday, April 12, 2011
More mastervolt.....
This is the Digital DC 10X10Amp in the saloon, port side, forward locker. It can control 10 circuits of 10Amps each. It will control all the lights in the V-berth, Ford. heads, forward part of the saloon. It will also control the lights/fans in the galley area and power the refrigerator. It will also control the masthead lights, each light will have its own breaker, which will permit automatic monitoring of the bulb state.

All cables are fed through 1.5in PVC conduit.


All cables are fed through 1.5in PVC conduit.


Monday, April 4, 2011
Mastervolt system...Kick A$$ !!!!!!!!!!!!!!!!
This is just a dump of photos taken during a Mastervolt dry run (read-couldn't wait to install the stuff properly). All I can say is WOW.
I will explain each photo as I get a chance and as I learn more;
The main input/output modules. DC Distribution 500 on left and Mastershunt 500 on right.

The main distribution modules Digital DC 10X10Amp (Three, one port forward, one at chart table, one port side engine room.)

I set up 4 sample loads;
1. Hella fan
2. Halogen cabin light
3. A reading light - with DR Led LED.
4. Alpenglow cabin light

You can name the loads and the names show up on the MasterView Easy touch screen. This is your main controller. The darker lines on the right/bottom of each switch box means that the circuit is on, top/left means that it is off. The PC is only for setup and programming.

Each circuit can be controlled in a number of sources, including;
1. Local switch (e.g. on this reading light).
2. By a Cole Hersee/Carling type rocker switch
3. By the MasterView.
4. By the software on the laptop.
5. By sending a cell phone SMS message to a Mastervolt GPRS Module installed on the network. I may pass on this option.
etc.
The green PCB is the Switch Input 4, this can take 4 rocker switches which can be set to control any circuit on any of the Digital DC 10X10Amp units. Lets say you decide to control the spreader lights from from your bunk in the aft cabin. Just install a Switch Input 4 (or Switch Input 3), connect it to the nearest Masterbus unit, set up the software and its done.


The MasterView Easy can display a selection of data. This is the "home page" which displays Amps in/out of the house battery and voltage.

This is the display with a charger in the system (not the MV Combi) just a temp one I use. Interestingly the charging amps show up as a minus.

Would you prefer it in red?

State of the Master Shunt with the charger off.

Software showing a blown fuze on the DC Distribution 500.

Same blown fuse shown on the MasterView Easy - nice.

All lights can be set up as dim-able by just keeping the switch pressed.


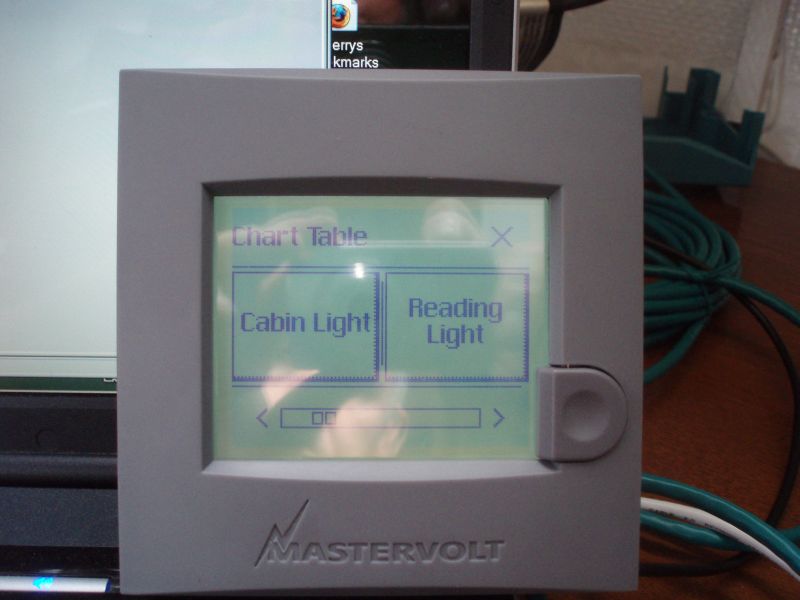
Now this switch controls the cabin light.


A few mouse clicks later it controls the reading light.

I will explain each photo as I get a chance and as I learn more;
The main input/output modules. DC Distribution 500 on left and Mastershunt 500 on right.

The main distribution modules Digital DC 10X10Amp (Three, one port forward, one at chart table, one port side engine room.)

I set up 4 sample loads;
1. Hella fan
2. Halogen cabin light
3. A reading light - with DR Led LED.
4. Alpenglow cabin light

You can name the loads and the names show up on the MasterView Easy touch screen. This is your main controller. The darker lines on the right/bottom of each switch box means that the circuit is on, top/left means that it is off. The PC is only for setup and programming.
Each circuit can be controlled in a number of sources, including;
1. Local switch (e.g. on this reading light).
2. By a Cole Hersee/Carling type rocker switch
3. By the MasterView.
4. By the software on the laptop.
5. By sending a cell phone SMS message to a Mastervolt GPRS Module installed on the network. I may pass on this option.
etc.
The green PCB is the Switch Input 4, this can take 4 rocker switches which can be set to control any circuit on any of the Digital DC 10X10Amp units. Lets say you decide to control the spreader lights from from your bunk in the aft cabin. Just install a Switch Input 4 (or Switch Input 3), connect it to the nearest Masterbus unit, set up the software and its done.


The MasterView Easy can display a selection of data. This is the "home page" which displays Amps in/out of the house battery and voltage.

This is the display with a charger in the system (not the MV Combi) just a temp one I use. Interestingly the charging amps show up as a minus.

Would you prefer it in red?

State of the Master Shunt with the charger off.

Software showing a blown fuze on the DC Distribution 500.

Same blown fuse shown on the MasterView Easy - nice.

All lights can be set up as dim-able by just keeping the switch pressed.


Now this switch controls the cabin light.


A few mouse clicks later it controls the reading light.

Sunday, April 3, 2011
Initial Mastervolt install....
Amongst the numerous half finished projects on-board is the DC distribution install. The Mastervolt people have been great in replying to my myriad of questions. So far I love the MV system. The great (and possibly only) benefit of wiring your own boat is that you should know how everything works. The problem is that, despite having read most of the books, there are still gaps in my understanding of electrickery. I will have a qualified grownup check everything before it goes live.
This is the distribution diagram for the system, so far;

One interesting element of the layout is that the house batteries are linked to the Mastershunt 500 via a switch. All the loads, Combi charger, alternator etc. are linked into the DC Distribution 500 and then, via the Mastershunt 500 to the House batteries. If the switch is off the house batteries cannot be charged. I'm not sure if this is an issue or not.
Basic wiring;


Subscribe to:
Posts (Atom)