Wednesday, April 28, 2010

Aft Heads lockers etc....

For any Whitby owners who want to know what the insides of the lockers in the Aft. heads look like...


Nothing too scary. Just a little rot from the chain-plates leaks. Git Rot and a coat of West System and some cloth will take care of that. The locker in the lower right of the top photo (most of which is normally obscured by the sink top) looks like a candidate for a water heater. I would install the work surface so that it could be removed/replaced via the heads and not the engine room. The dimensions are 16" Wide, 20" deep and 22"high.

The INDEL MARINE USA, Basic 24 Water Heater, 6.4 gal. Capacity, 19-5/16"L x 15-9/16"dia. seems to be a candidate. It can be mounded vertically on the fuel tank bulkhead.


Or the RARITAN, 1700 Series Water Heater, (6 gal. Heater, Exchanger/120V AC, 14-1/2"dia. x 16-1/4"H )


I am trying not to comment on the individual who put a through hull in the lower right hand locker which could only be serviced by a very skinny person with 5ft long arms.

Monday, April 26, 2010

Deck leaks.....

While working on the work bench and the wardrobe on the starboard side of the aft cabin liberal use of marine sealant was discovered along the joins in the headliner.


Almost all of us know that putting sealer below a leak never, ever works. This does not mean that most of us are tempted to try it at some time or other. In any event I removed the sealant and will now try and trace the leak (s). The good part is that it is not the hull to deck joint. The fact that I am dealing with a headliner means that this is not as clear cut as one might think.


The area in question is the starboard side of the cockpit, where there a teak coaming extends inwards to provide a backrest.


With the teak coaming removed it was obvious that the whole area was a water (and mud) trap. The two outboard lockers appear to be watertight (?) on the bottom but I suspect that a crack exits somewhere which allows water to leak onto the headliner and then into the lockers below.

The small indentation on the left hand side of the photo is for a drain which was never fitted, but I believe is necessary.

Sunday, April 25, 2010

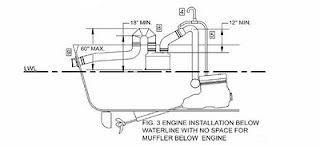
Correct material for Dry Riser for engine exhaust...

Table 1 in the same Article specifies allowable materials for exhaust systems. The dry exhaust list specifies aluminized steel, carbon steel, nickel-iron chrome and stainless steel. No galvanized steel, no brass, no bronze.

Reference: http://www.ntsb.gov/Dockets/Marine/D...012/234864.pdf

This is the idealised recommendation from the Perkins Sabre installation manual;

"The general arrangement (A) shows that the dry part of the system extends to a safe height above the water line, using an elbow (A1), a stainless steel bellows (A2), a riser pipe to give the required height (A3), and a further elbow (A4), which is supported from the deck head by a flexible hanger, which supports the weight of the system but permits movement side to side and fore and aft."

"The minimum diameter of the dry part of the system should be 40mm (1.6”) for the M65 and the wet part of the system should be not less than 63.5mm (2. 1/2”).

We will see how close we can get. ANY and ALL recommendations and advice graciously accepted.

Fuel fill final....


The upper vent hose goes to a charcoal filter under the teak coaming in the cockpit.

Wednesday, April 21, 2010

Engine exhaust.......

Jim, the guru is trapped in Urop by the evil Icelandic dust so I have time to try and plan the engine exhaust system. From the measurements, I will need a 20"dry insulated riser, with the cooling water injected on the down side.

These are the measurements on TIH.


These are the recommendations from the Vernalift website;


(diagram courtesy of Centek Ind.)

Obviously I have to watch out for excessive back pressure. Any advice welcome.


Wednesday, April 14, 2010

Mastervolt decision....

The decision on the rewiring of TIH has been accelerated by the arrival of the engine. I can either rig up an interim solution or bite the bullet and install, at least part, of the final system. Having studied the matter for some time I firmly believe that a smart distribution system is the way to go. I have yet to see a retrofitted traditional system look good unless it was installed by a very "high end" (read expensive) installer. The labor costs and the costs of cable for a traditional setup certainly make a system such as Mastervolt very attractive.

Now as I understand it;

You run your shore power into an;

Isolation Transformer;


Which stops you frying divers and your hull fittings. And then into a battery charger;


And then via a shunt and connection whatsit


To your batteries.

You then feed the power to lights, bilge pumps, nav equipment, fans and all the other electrical stuff back through the shunt, via a number of these;


using large cables. Each unit can feed 10 individual systems (a lighting circuit, a pump, a refrigerator etc.) of up to 10Amps each (more if combined).

The whole system is monitored by;


and switched using a variation of these, if necessary;


Its all done electronically, even the fuse settings are set using software. The system has a manual backup (blade fuses) in the event of catastrophic failure.


This is the MasterBus USB Interface. I'm sure I'm missing a whole heap of important technical details but the system works for me. Its got to be better than;


This may have gotten a little out of hand.....

but for what its worth this is the fuel fill system.


All three tanks (Stbd, for'd keel, aft keel) can be filled from one 2" deck fill. The gray elbow at the top is a "Vetus Splash-Stop" device. The days of getting away with fuel squirting out of the boats stern as a means of knowing when to stop pumping is well over. The "Green Marine Fuel Whistle" (white item) gives the first indication and then any overflow goes back into large pipe to the right of the main fill. All tanks can be isolated. I am waiting for 2" fuel hose which is on back order and to connect the 5/8" vent hoses. The vent (brass fitting on the left of the "splash stop" goes to a carbon filter and then to a deck vent.

The black antiphon elbow on the left is for the bilge pump.

More incremental improvements...

In case anyone gets the impression that this boat is beginning to look anywhere near completion, think again. As soon as I complete one job the next one manages to destroy half of the previously completed work. TIH is currently a collection of half completed projects in a fiberglass skin.


I did manage to get the stbd. fuel tank boxed in and the workbench / chart storage put back in place. Nowhere near a perfect job as nothing lines up on a boat. I plan to bolt the tool chest in place, but that may change. A lot will depend on how I can adapt the original shelf facing that used to hold the electrical panel and a bookshelf.


The eagle eyed amongst you (assuming anyone is reading this) will notice the white discoloration on the epoxy under the lid. This is what happens when you paint on West System and then leave the lid in the sun for 5 days (duh). All the marine ply panel on TIH that I remove will be coated with West System Epoxy before being reinstalled.

Thursday, April 8, 2010

Printing out a Blog......

For most of us, keeping a blog is an exercise in self indulgence. Why would anyone care about our musings and rantings on our pet projects. On a boat renovation project, however, it also serves as a record of the work done. This could be of value when trying to remember exactly how we installed some piece of equipment (believe me, people forget) or it may be of major benefit when selling the boat.

To this end I thought it important to keep a paper record of the blog. I considered it printing it out but then I stumbled on;

Blog2print

This is the result. Nice product, well executed.


Tuesday, April 6, 2010

Installing all the electronic / electrical /mechanical bits....

When you own an older "classic plastic" sailboat you quickly realize that much of the above mentioned equipment has been changed over the years. Electronic equipment is the most obvious victim of constant change. Not many 30 yo boats will have the original VHF, depth finder, autopilot etc fitted. Radio Direction Finders have gone the way of the Dodo, thank God, I always hated them. The original electrical fit will probably have survived, but it will have received many "upgrades" in the form of additional wires piggy backed on to existing switches, new inverters etc. Mechanical water pumps will have been replaced numerous times and the manufacturer will have made sure that the securing holes are never in the same place. Water Heaters will have been added, refrigeration may have been replaced.

Many of these replacements will have been undertaken by a marine technician who has three overriding principles;

1. Mount the item where it is convenient to him/her, based on their arm reach, ability to work inverted etc.
2. Ignore anything below/under the new item which may have to be changed out in the immediate future.
3. Never, under penalty of flogging, remove the wiring/piping from the old item which is now redundant.

As TIH is in effect an "empty" boat none of the above rules apply to me. My preference is to mount everything on the saloon table, where I can work on it sitting on the settee. That's probably not going to happen.

My second choice is to give everything as much open space as possible and where I can access it for repair/replacement. Keep as much electrical stuff out of the bilge as possible (except for batteries). Keep as much electronic stuff (inverters etc.) out of the Engine Room. And try and get it all done before my wife realizes what I'm up to (Ocean Dove's comment about closets is correct).

Watch this space....

Monday, April 5, 2010

Wood butchering.....

I recently discovered this saw;


Shark Corp 10-2312 12-Inch Carpentry Saw

It has made a huge difference in my ability NOT to butcher a piece of wood. Strongly recommended.

Storage of charts......


I may or may not have a dedicated chart table on TIH. I will, however, always have paper charts. IMHO this is non negotiable on a cruising sailboat. Charts have to be stored flat and not in tubes or using them will drive you nuts. The space over the Stbd. fuel tank was originally designed for this and I have sized the partitions accordingly.

How much clothing storage does a boat need?

In my opinion, not a whole lot (my wife's opinion may differ slightly). Storage Vacuum bags will hold pretty much anything you need. These can be jammed into any available space.

More important priorities are;
1. Easy access to motors, chargers, pumps etc.
2. Food storage.
3. Booze storage.

To this end the outboard side of the hanging locker in the Aft cabin will become an electrical locker.


Air vents (and possibly a small fan) will be provided cooling and the item can be readily accessed for maintenance etc. Plenty of room is available for hanging clothes, should the need arise.

Thursday, April 1, 2010

Legacy Equipment........

When I purchased the "Hull" I also inherited some boat bits. One of these is a S-Lectric windlass. its been sitting on the floor of my apartment for over a year, so I decided to take a look at it.


Ooookkkk a rubber belt! That could be fun on a dark night when the wind turns your anchorage into a lee shore.


A Jolly old British motor. Siba was a part of Lucas, I believe.