Tuesday, November 15, 2011
Taking a break from boatwork for the next few months....
to sort out a few issues. Plan to resume early 2012.
Thursday, October 20, 2011
PB200 - Major extravagance....
Sailors can be poor, cheap or both. I am firmly in the last group. It is therefore with much trepidation I dropped 10 boat bucks on an Airmar PB200.

The thought of this lovely piece of technology perched on top of my mast, in the way of lightning, bird poop, UV rays and bridges is enough to cause me sleepless nights.
If you haven't heard about the PB200 Click here.
Its main task will be to drive the autopilot under sail. For that reason alone I think its worth the money.
Tuesday, October 18, 2011
Mast overhaul....
When I splashed TIH three years ago, I re rigged the mast but did not overhaul the fittings. I took the opportunity during this hurricane season to pull the mast again and carry out some work. This will include adding 32 mast steps (folding type), overhauling the sheaves and replacing the tangs.

I am still trying to ID the mast manufacturer, all suggestions welcome. Dimensions are 9 7/8" by 6 3/8".

I will install a spinnaker bail on the forward end of the masthead (right hand side of this photo). This is to take a roller furling Code Zero (Facnor FX 2500).

I really, really want to remove the SS bolts that hold the tangs on the mast (masthead and spreader) but they are proving a bear to move. The Kroil releasing fluid is excellent.

Spreader holder. The four rivets on the upper side had corroded away.

Spinnaker boom track.

Masthead sheaves (2 by 5"diameter by 3/4" rope sheave + 1 by 5"diameter by 1/2" wire sheave in the middle. As I don't plan to use wire halyards I may try and swap this sheave out.

Dual backstay connection.

Movable goosneck connection for boom.
Monday, October 3, 2011
Thursday, September 29, 2011
Working on OPBs' (Other peoples boats)...
So not much time for TIH. I did manage to get the mast pulled. Three years ago (time flies when you etc.) when I splashed TIH the mast was stepped with new rigging and new wiring in the usual boatyard scramble. I had always planned to have a second go at some of the 34yo fittings.
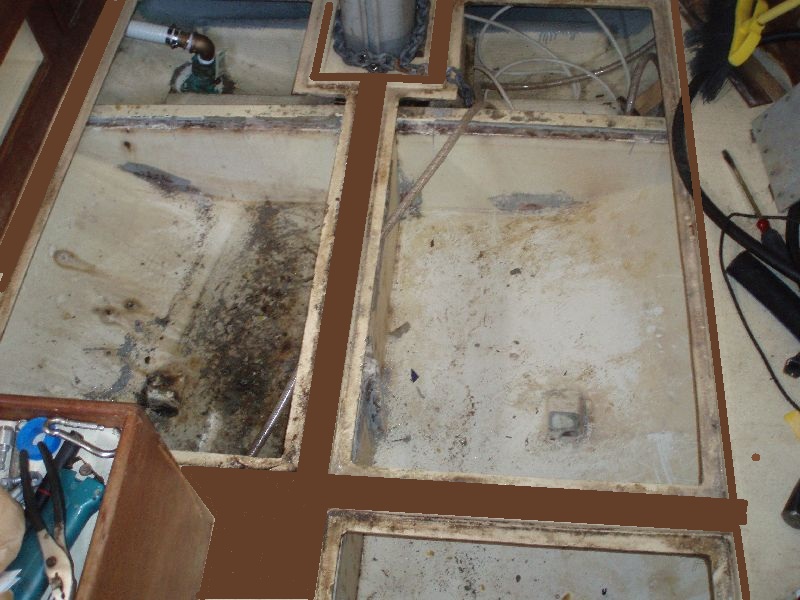
The first part is the very nice fiberglass mast step molded into the hull. For any W42 owner who has not gotten up close and personal with these, this is what you will face.

Mast step which may or may not have an aluminum plate on the bottom. Teak chocks to stop the base of the mast moving around.

Aluminum plate removed.

Chocks removed. They may have been gooped in place at some stage but I'm not sure it was necessary.

Now the fun part. The holes (arrowed) were the original limber (drain) holes which are;
a. Too small
b. Covered by the aluminum
c. Then covered by the chocks.
This resulted in a nice stagnant pool of water covering the base of the mast.
I have now drilled 4 larger holes, enlarged the originals, I will notch the aluminum plate and ensure the chocks do not obstruct the drain holes.
Monday, September 19, 2011
A tale of two anchors.....
TIH came with two 45lb CQR anchors. One I traded and the second one has hung on the bow for the last three years. These are not my favorite anchors but I know they do have their supporters. My anchor of choice was to be the ROCNA with a possibility of the very similar MANSON as an alternative. ROCNA has recently been in the wars due the use of a lower spec steel after it outsourced production to China, see;
I'm not convinced that the issue is major but ROCNA appears to have made little or no effort to address the situation. As a result I am happy to default to the 60lb MANSON. The Supreme 60 is specked for 45' to 55' Boat Length but the company does recommend moving up a size if you plan to anchor in testing environments. I will only be keeping one anchor on the bow so weight will not be an issue.
My backup anchor will be the CQR 45 (or its replacement) stowed below decks, a Fortress FX-55 partially assembled in the V-Berth and a steel 35lb DANFORTH secured aft as a kedge anchor.


Monday, September 12, 2011
Overbuilt......

When it comes to the boats critical systems I tend to err on the side of "overbuilt". This is the aluminum platform while holds the steering bracket.
Tuesday, September 6, 2011

Louvred inserts screw up.....
I have always wanted to brighten up the interior if TIH and decided to replace some of the drawer/locker fronts with teak louvered inserts. Well it had to happen. I ordered teak inserts from Thai Teak Marine and between the contact and myself we got our measurements screwed up. The cutout size became the overall size.


I purchased some 1.25" teak trim and placed it around the opening. I now think it actually looks better.


I purchased some 1.25" teak trim and placed it around the opening. I now think it actually looks better.


Monday, August 29, 2011
Steering Modification....
Hard to believe that I've being faffing around with the quadrant section of the steering for almost a year. The initial plan was to bolt an aluminum plate onto the forward quadrant bulkhead and run the pull-pull conduits directly into "L" brackets on it. This sort of copied the original Edson design. I went as far as having the plate made. The attempted installation was a PITA and I hate having to work upside-down.
Now I know that all of you with wire steering systems check and oil the sheave bearings MONTHLY and check and oil the wire ANNUALLY (monthly if its a pull pull system), as per the Edson instruction manual. If I am to do it more that once a decade it cannot involve me hanging upside-down.
On a whim I called the help desk at Edson and talked to a very helpful person who appeared vastly knowledgeable on the subject of steering. I told him that I was following the Edson conversion plan for the Whitby 42 and he promptly told me that that plan didn't really work. In fairness I had conveniently ignored the penciled in "Extra Sheaves here" bit. Basically any 90degree bends in a pull-pull system are not recommended as the wire tries to straighten out the conduit. The conduit is ideal for small vertical/horizontal bends to allow the cable to move in a more or less straight direction. He talked me through some modifications.
To shorten the story I have now purchased two in/out pull-pull sheaves and the larger reversible sheave bracket rudder-stop.

The wooden part is a mock up for an aluminum plate which hold all the components and will be bolted through the fiberglass bulkhead.

No more upside-down steering maintenance for me. For info, the help desk guy I spoke to double jobs as the Edson President, Will Keene.
Wednesday, August 24, 2011
Arty farty shelving......

Oak balance shelving is available from the Conran Shop for $973.75

Gerry's clearance priced teak shelving is available at West Marine (now almost sold out) for $100 (all 4 shelves). A lick of varnish and its done.
Tuesday, August 16, 2011
Secret toy.......

I bought this device over a year ago, smuggled it on-board and have kept it very quiet ever since. It looked too good to be true and like many of the "must have" items I've bought at boat shows from efficient looking women, destined to be taken ashore in the dead of night and put in a dumpster. But NO. After 12 months of use, it rocks. Its not for the likes of RJ and his fancy smancy CNC table or those poor kids who did shop is school while us rich kids did useful stuff like Latin and Greek. Its for anyone who can not cut a straight line or screw in two screws without getting a blister.
More importantly all the bits fit into the locker on the port side of the saloon.
Check it out here but, while I love it; "caveat emptor" (that's Latin).
http://www.amazon.com/gp/product/B001FWXODC
Thursday, August 11, 2011
Don't get too used to that...sweetie!!!!!!

Wow, do I know my wife or do I know my wife.
My projects generally break down as follows, 50% planning, 25% looking for my tools, 25% working. The pegboard was an effort to reduce the 25% tool search to 20%. After showing the photo to my wife the first comment was as posted in the title. This is a temporary setup, which will be removed once the boat is operational, :-(.
Saturday, August 6, 2011
We got Jimmy Buffett...it's all good...

Fusion radio with Ipod dock, installed.

With AC controls and Fusion remote control installed.
Tuesday, August 2, 2011
120V system...finally
How did I get from this for $80 at the Dania Flea Market;

To this, from Blue Seas at several multiples of boat buck$;

And yet I am well pleased.


And I'm finally rid of the hanging cable farm over my head.


To this, from Blue Seas at several multiples of boat buck$;

And yet I am well pleased.


And I'm finally rid of the hanging cable farm over my head.

Wednesday, July 27, 2011
More electrical.....
Navigation desk nearing completion. The top left hand panel is the complete DC control panel. The Easy View touch screen that shows battery / fuze / charging status and permits touch button control of any of the 30 circuits. The 8 Carling breakers can be assigned to any of the most commonly switched circuits (e.g. Fresh water pump, anchor light etc). The other grey faceplate is the control/indicator for the inverter charger.
The top right panel will house a GPS, bottom left a VHF, bottom right the SSB.

My buddy Nat, a serious electrical guru, has started the shore power 120V install.

The top right panel will house a GPS, bottom left a VHF, bottom right the SSB.

My buddy Nat, a serious electrical guru, has started the shore power 120V install.

Thursday, July 21, 2011
Hot weather work.....
Teak inserts in Nav panel. They will allow cut-out for various instruments. If I change the instrument later I will only have to replace one panel.

Electrical conduit. Top two 120V, bottom12v DC.

Clever idea from my shipmates on Toberua II, If you have to put a facing panel in a locker make it out of perspex. Then you can see the junk stored inside.


Electrical conduit. Top two 120V, bottom12v DC.

Clever idea from my shipmates on Toberua II, If you have to put a facing panel in a locker make it out of perspex. Then you can see the junk stored inside.

Tuesday, July 19, 2011
Forward heads revisited......
A loonnggg time ago I had planned to give the forward heads its own holding tank. After much cutting and grinding I realized that this was going to be more trouble that it was worth. While I accept that holding tanks are a necessity I consider them a major PITA. Having two would just double the experience. In any event I need the space for the bow thruster.
As per LAVAC drawings I had not installed an antiphon valve in the waste hose, this was a mistake. The water siphoned back into the bowl and while it did not overflow it did back-flow waste from the hose with the inevitable smell.
Antiphon valve now installed. All hoses/pump etc. surface installed for ease of maintenance. Wife not majorly impressed but she won't be maintaining it AND its the boy heads.

In keeping with the "boy heads" element it will pump directly overboard (where legal) or back to the holding tank in the engine room. As I hate "Y" valves I have copied this system from another W42.

Bow thruster, nice V. need to have?
Well discussion over, $600 for a new Vetus 4HP pretty well sealed the deal.


Friday, July 15, 2011
KiwiGrip - deck paint....
I have always been interested in this product as a deck paint. But I may also use it as paint for the strips on the cabin sole.
Kiwigrip

To date they only produced white and pastel colors but I just go this e-mail from them;
"My factory is also brewing a "tan" color - something "teak-like" but I would stop way short of calling it dark brown! It'll be a light tan. They are brewing this week for shipment in a week or two. Then 25 sailing days, and 10 days getting thru customs and into our warehouse here in Seattle. This means it should be here end August, early Sept. If your schedule will allow, you may want to give our new "tan" a whirl. - Willy Stiggelbout "
If it looks horrible I can always paint over with a lighter color.
Kiwigrip
To date they only produced white and pastel colors but I just go this e-mail from them;
"My factory is also brewing a "tan" color - something "teak-like" but I would stop way short of calling it dark brown! It'll be a light tan. They are brewing this week for shipment in a week or two. Then 25 sailing days, and 10 days getting thru customs and into our warehouse here in Seattle. This means it should be here end August, early Sept. If your schedule will allow, you may want to give our new "tan" a whirl. - Willy Stiggelbout "
If it looks horrible I can always paint over with a lighter color.
Wednesday, July 13, 2011
Cabin Sole and saloon deck...advice needed.
At some stage I will have to face the cabin sole paint project. New W42 owners were give two options for the cabin sole;
1. A full teak and holly sole at extra cost.
2. Drop in floorboards (teak and holly) which fit into the molded inserts in the hull liner.

The second option, which I have, leaves a painted white strip between the floorboards which I think looks a bit weird.

The PO was kind enough to include a complete set of new drop in boards with the boat. These have been languishing in my apartment for some time.

My two questions;
1. Any ideas on how to deal with the fiberglass strips between the boards (paint, what color, teak strip glued on, etc)?
2. What type of varnish for the new floorboards?
Thursday, July 7, 2011
Electrical wiring conduits.....
Might not be everyone's aesthetic choice but the accessibility works for me.


Subscribe to:
Posts (Atom)